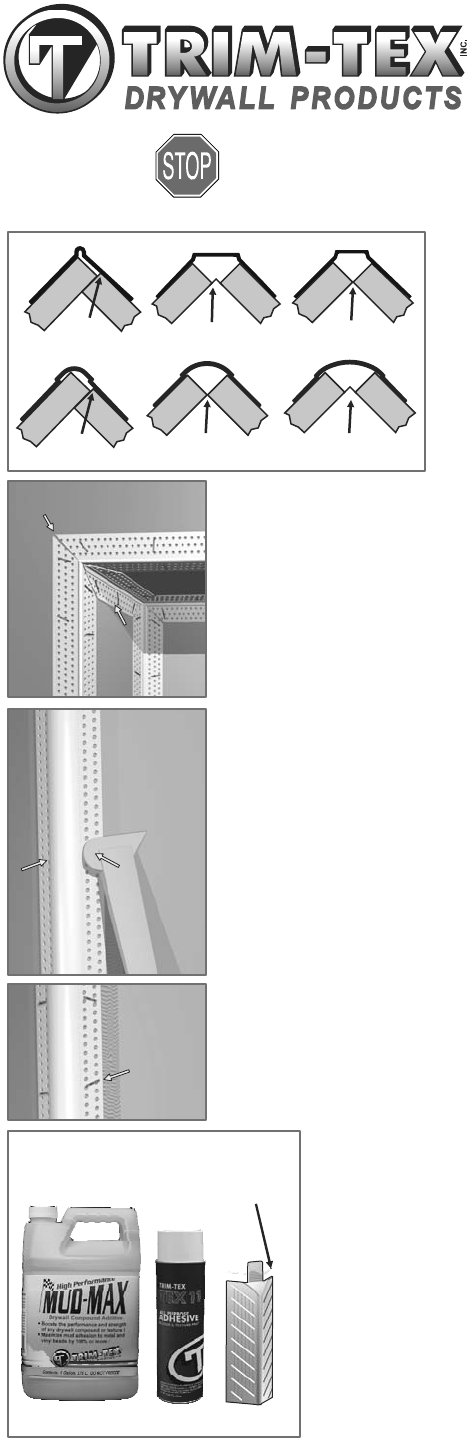
Pressure
Mud Legs
Pressure
Mud Legs
Staple
Mud Legs
Staple
Mud Legs
Please read entire instruction before proceeding.
ALTO: Favor de leer las intrucciones antes de comenzar.
Installation Instructions
for Trim-Tex Corner Beads
Step 2: On vertical corners, do not allow the bead or bulladapter to
touch the floor. Always install with a ½" gap to prevent structural
settling from cracking the mud. If you're using 2 ways, 3 ways or
Bulladapters install these first with 847 Spray Adhesive & Staples.
To glue the bead to the molded corners, put a dab of Bondaflex 700
Caulk on the tabs of the corners. Where beads meet, snip back mud
legs as shown. Do not overlap mud legs. Dry fit as needed.
Step 4: Staple the mud legs every 6" with ½" divergent staples
(available only at your Trim-Tex dealer). Reapply pressure to the
mud legs as needed to guarantee a proper bond. On arched beads
you may need to staple every tab. Securely attaching the bead
minimizes the chance of edge cracking. DO NOT install the bead
with nails or drywall screws.
To install 350 Chamfer Arch, follow the above instructions.
Additionally, for best performance staple every arch tab. Mud the
nose of the bead to fill in the slots. Do not use Fast Setting
Compounds as they tend to be brittle and may fail.
Improper installation will void any applicable warranty. Instalacion herronea eliminara la garantia
Step 1: Use minimal drywall setback on
90º Outside Corners & 350 Bull. For
other bullnose and chamfer corners set
the drywall back as shown to the left.
Excessive setback will minimize
bondability. Make sure the edges of the
board are cleanly cut. Ripped or rolling
paper will prevent the mud legs of the
bead from sitting flat on the wall. Do not
use the tapered edge of the board for
outside corners.
Step 3: Test 847 in your conditions, especially in extreme heat and
humidity or cold. 847 is designed to attach the mud legs of Trim-Tex
beads to drywall. For adhering return flange of large L Beads, use
adhesive caulk. Follow any product specific installation instructions.
Shake can. Hold can 6-10" away from surface being sprayed. For
ultimate bond, especially on expansion products such as Magic
Corner™ spray a coat of 847 on the mud legs and the drywall. For
single surface application, apply two medium coats to the drywall or
the mud legs. Install bead immediately and pressure the mud legs to
the drywall. If the adhesive dries and there is no tack to it, apply
additional coats.
350 Bull:
Minimal Setback
3
/ " Bullnose:4
as shown
1 ½" Bullnose:
/ " Setback
3
8
Paso 2: Para esquinas verticales , no permita que
el esquinero o el adaptador para bull nose toque
el piso. Siempre mantenga un espacio de ½ " para
evitar que el material se reviente cuando la
estructura se mueva. Si utiliza esquinas de dos o
tres sentidos, instale estos primero al igual que
los adaptadores para bull nose con pegamento
847 y grapas. Aplique Bondaflex 700 Caulk a la
extremidad antes de instalar el esquinero sobre
esta pieza. Donde dos esquineros se unen corte
las extremidades como se indica a la izquierda,
no encime una extremidad sobre la otra.
Paso 4: Engrape las extremidades cada 6" con
grapas expansivas de ½ " (disponibles solamente
por medio de distribuidores de los productos Trim-
Tex) . Presione nuevamente las extremidades
conforme sea nesesario. Para esquineros de
arco, tal vez sea nesesario engrapar cada horeja .
Un esquinero bien instalado evita problemas
cuando la estructura se mueva. No instale los
esquineros con clavos o tornillos
Paso 1: Use un espacio minimo con el drywall
para esquinas cuadradas de 90° asi como para el
350 Bull. Para otro tipo de esquineros, instale el
drywall como se indica a la izquierda. Espacio
excesivo al instalar el drywall reducira la adicion.
Asegurese de que las esquinas del drywall esten
bien cortadas . Papel extra sobre el drywall
impedira que las extremidades de el esquinero se
instale parejo sobre el drywall . No use los lados
con reseso para instalar esquineros.
Paso 3: Pruebe el 847 en sus condiciones
climáticas, especialmente en extrema calor y
humedad o frío. 847 es diseñado para pegar las
extremidades de los esquineros de Trim-Tex a la
tabla roca. Para adherir la extremidad grande de
los grandes esquineros L, use Silicon. Sigua la
instrucciones de instalación especificas del
producto. Agite la lata. Detenga la lata de 6”-10”
de la superficie. Para el mejor funcionamiento,
especialmente en productos de expansión como
el Magic Corner, aplique 847 a las extremidades y
a la tabla roca. Para aplicar en una superficie
nada más, aplique dos veces en la tabla roca o las
extremidades. Instale el esquinero de inmediato y
presione las extremidades a la tabla roca. Si se
llega a secar el 847 antes de instalar el esquinero,
aplique más 847.
Finishing: To improve the bondability of drywall
compounds, textures & plaster products to any bead,
use MUD-MAX Drywall Compound Additive. A must in
extreme climates and in larger homes prone to settling
and movement. If you will be applying a texture finish to
the exposed areas of the bead, apply Trim-Tex Tex11
Texture Prep after finish sanding, but before the
application of the texture.Tex11 greatly improves the
bond of the textures to the bead. Trim-Tex vinyl beads
are made with a proprietary blend that creates a matt
finish ideal for painting. Priming is not required and
always use a high quality paint.
ChamferAdapter is design to be used right out of the box
for Chamfer Bead. To use with 350 Chamfer Bead, snip
the adapter along guidelines on the top edge.
Terminado: No todos los compuestos de
acabado estan hechos de la misma manera .
Unos se adieren mejor que otros . Para mejorar la
adicion de texturas, productos de yeso asi como
para el acabado del drywall sobre todo tipo de
esquinero, use MUD-MAX . Nesesario en climas
extremos y en casas propensas a movimiento
estructural. Si usa textura sobre la parte expuesta
de los esquineros, aplique Tex11 despues del
lijado pero antes de a textura. Tex11 mejora la
adicion de las texturas sobre los esquineros .
Contact us today! Phone: 800-874-2333 / Fax: 800-644-0216 / www.trim-tex.com
350 Chamfer:
as shown
Snip marks for
350 Chamfer Adapter
Chamfer Bead:
/ " Setback
1
4
Corner Bead:
Minimal Setback
 (1 pages)
 (2 pages)
 Manymanuals.com
 Manymanuals.de
 Manymanuals.fr
 Manymanuals.it
 Manymanuals.pl
 Manymanuals.cz
 Manymanuals.es
 Manymanuals-pt.com
Comments to this Manuals